|
|
| Line 20: |
Line 20: |
| | |- | | |- |
| | | align="center" style="padding: 10px" | [[File:ScanImagesButton.jpg|link=Acquire Image from A Scanner]] || style="padding: 10px" |Will use an intermediate software driver to display images, e.g. scanner software or camera's own thumbnail display software. See [[Acquire Image from A Scanner]] for more assistance. | | | align="center" style="padding: 10px" | [[File:ScanImagesButton.jpg|link=Acquire Image from A Scanner]] || style="padding: 10px" |Will use an intermediate software driver to display images, e.g. scanner software or camera's own thumbnail display software. See [[Acquire Image from A Scanner]] for more assistance. |
| − | |}
| |
| − |
| |
| − | ===Notes on Device Types===
| |
| − |
| |
| − | <!-- should this be in the top-level imaging section with more entries for web-cams, mobile phones etc ? -->
| |
| − |
| |
| − | {| class="wikitable" style="width: 80%; padding: 8px; align: center;"
| |
| − | |-
| |
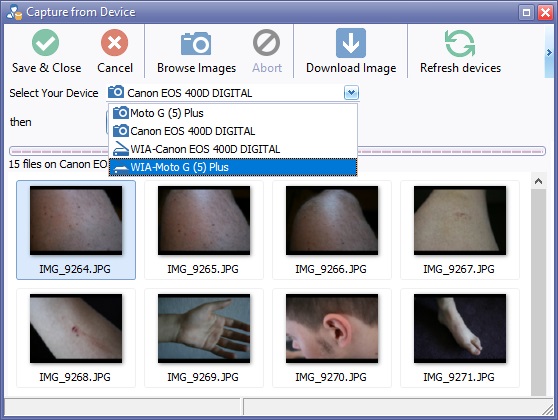
| − | | align="center" style="padding: 10px" | Cameras || style="padding: 10px" | You may see two entries in the device list for your camera. Ideally you should select the name of the device in the drop down list that has the camera icon; ''avoiding any with the WIA prefix''. Downloading images from cameras using the direct method is best to ensure you preserve all the technical data associated with the image, such as the date and time the photo was taken, camera make & model, etc.<br><br>Downloading images from the camera using the WIA device will still work perfectly for the image data, but you may not get the associated technical data. In such cases, the current date/time is used on the imaging record.
| |
| − | |-
| |
| − | | align="center" style="padding: 10px" | Scanners || style="padding: 10px" | You should only have a single device listed which will have a scanner icon. When the Acquire button is pressed, it will launch your scanner software.
| |
| − | |-
| |
| − | | align="center" style="padding: 10px" | Mobile Phones || style="padding: 10px" | When connected via USB you may need to alter your phones USB Connection Method. On Android the default mode is ''USB for Charging'' which you should see in your notification pull down. Tap on this option and change to ''Photo Transfer (PTP)''. When this is set correctly you will see your phone listed in the same way as a camera. Again, using the device with the camera icon is recommended (avoiding the WIA device entry where possible). If your phone does not give you a PTP option, use the File Transfer (MTP) option instead, but you may see a lot more files, some of which are not images.
| |
| | |} | | |} |
Latest revision as of 15:08, 12 April 2019
Click the New Button  on the toolbar of your clinical record, such as an IBID Record or a Significant Event.
An Available Items box will open.

Select Get Images from device and click the "OK" button.
Choose the device required from the Select Your Device drop down list.
Import Methods
Depending on the device chosen, you will see one of the following two options.
 |
Will use a direct connection to display & select images on the camera. See Import Image from A Device for more assistance.
|
 |
Will use an intermediate software driver to display images, e.g. scanner software or camera's own thumbnail display software. See Acquire Image from A Scanner for more assistance.
|

