Difference between revisions of "Database and Server Set Up"
(Removed reference to custom installation option - no longer appropriate.) |
m |
||
| Line 69: | Line 69: | ||
Download the '''IBID Server MSSQL Script''' zip file from [http://www.ibidb.org www.ibidb.org] in the ''IBID Software Downloads'' section. Unzip to access the database creation scripts | Download the '''IBID Server MSSQL Script''' zip file from [http://www.ibidb.org www.ibidb.org] in the ''IBID Software Downloads'' section. Unzip to access the database creation scripts | ||
| − | Create an empty SQL Server Database and ensure that there is a database user with which to access the database. For installation of the application server you will need to know the server name of your SQL server, database name, user name and password. | + | Create an empty SQL Server Database and ensure that there is a ''database'' user with which to access the database. For installation of the application server you will need to know the server name of your SQL server, database name, user name and password. |
Using your tool of choice (usually MS SQL Server Management Studio) run the downloaded SQL scripts against the empty database to create the tables, views and to pre-populate the data. | Using your tool of choice (usually MS SQL Server Management Studio) run the downloaded SQL scripts against the empty database to create the tables, views and to pre-populate the data. | ||
Revision as of 08:29, 12 October 2012
This is a Technical (IT) Instructions topic
Contents
Target Audience
These instructions are of a technical nature & intended for trust level IT staff & requires experience of:
- MS SQL Server - creating databases and running scripts,
- TCP/IP - Installation and configuration of windows services, TCP/IP ports and firewall configuration
Overview
There are 3 steps to installing and setting up your iBID software:
- Create the Database
- Install the Application Server
- Run the BIBID Data Transfer and upload to the National Database
PRE-REQUISITES
MS SQL Server 2005 or later
The AquilaCRS (IBID) application server requires an MS SQL Server 2005 or later database. The app server supports SQL Server Express editions or above, and requires one of the SQL Server x86 or x64 Native Client drivers to be installed on the application server machine:
The database connection method is TCP/IP. In the case where SQL Express is installed, the TCP/IP protocol must be enabled and ports correctly configured for each IP address.
The application server (AquilaServer) will require it's own SQL Server username/password to access the database.
Physical or Virtual Server
AquilaCRS (IBID) is a multiple tier database and as such needs a server machine on which to reside. The database will be hosted on a SQL Server that will be present within the trust already. As such, the application server component does not require a great deal of disk space.
The application server component can co-exist with other systems and will happily co-exist with the existing BIBID server installation, so it is possible to re-use an existing server.
- The server machine can be physical or virtual.
- Running either Windows 2003 or 2008 Server
- Minimum RAM 4Gb
- Requires 4Gb free disk space (estimated data transfer and future years database size)
*App Server requires ~40Mb free
End User Application: Installation
The AquilaCRS (ibid) end user application is released as a "per-user" installation. This means each user needs to install their own copy. The installation is released as a ZIP file on the www.ibidb.org. Each user needs to have permissions to download this file.
End User Application: Automatic Updates
The AquilaCRS program is automatically updated on a regular basis for
- release of new field options
- security patches
- user requests
- bug fixes
In order for the automatic updates to work the following must be adhered to:
1. the AquilaCRS program files must be installed in a user-writeable folder.
2. the URL of the automatic update web service must not be blocked.  The domain name for the automatic update service is www.nbid.org.
For more information on writeable folders that are shared between users, please read the Shared writeable folders.
Web Services
AquilaCRS uses some web services for accessing updated data items (e.g. drop down list contents), for registering iBID systems & for accessing automatic software updates. The following domains need adding to the whitelist on your firewall/proxy server in order to prevent system failures:
1. www.NBID.org
2. www.BIBID.org.uk
Step 1. Database Installation
Download the IBID Server MSSQL Script zip file from www.ibidb.org in the IBID Software Downloads section. Unzip to access the database creation scripts
Create an empty SQL Server Database and ensure that there is a database user with which to access the database. For installation of the application server you will need to know the server name of your SQL server, database name, user name and password.
Using your tool of choice (usually MS SQL Server Management Studio) run the downloaded SQL scripts against the empty database to create the tables, views and to pre-populate the data.
Performance Note (Optional)
The table holding the audit trail information has an additional index that is required for the end-user application, but that will have a slight negative effect on performance during the BIBID Data Transfer. You may drop the index before the BIBID Data Transfer and Import, and then create the index again afterwards. The SQL command to create the index is:
CREATE INDEX idx_ilog_change_status ON ilog (change_status);
Step 2. Application Server Installation
Download the IBID Server Application Setup from www.ibidb.org in the IBID Software Downloads section.
- Unzip the AquilaServer_setup file
- Run the installer wizard.
- Edit the Connection String parameter during the installation. Replace the items in italics with your own settings
- AnyDAC?AuxDriver=MSSQL;Server=SERVERNAME;Database=DATABASENAME;UserID=USERID;Password=PASSWORD;
- Continue the installation wizard until complete.
- Open the port 8099 on your servers firewall. (The port number is changeable if necessary)
- The settings filename is aquilaserver.ini.
- Check services.msc to ensure that the AquilaServer service has been started and is set to Automatic.
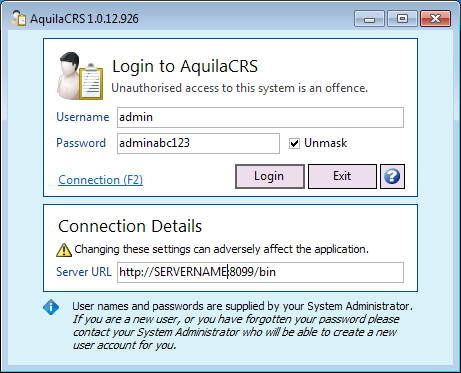
Client Application Server URL
The Server URL is needed by all users of the IBID application on their first login, and is made up as follows:
http://SERVERNAME:PORTNUMBER/bin.
If the application server is installed on a server called TRUSTSRV01 and is listening on the default port, then your Server URL is http://trustsrv01:8099/bin
Step 3: IBID Installation And Setup
- Download the IBID User Application Setup from www.ibidb.org in the IBID Software Downloads section.
- Run the installation program and enter the Server URL when prompted.
- Run the client application and log on with the username admin and the password adminabc123 (case sensitive) and the enter the Server URL previously mentioned by clicking on the 'Connection' link on the login form.
- Go to the IBID Installation and Setup page.
- Register your IBID System:
- Enter your IBID Unit ID and click Register. This will open IBID features in the software and also test connectivity to the National Database.
- Perform the BIBID Import and transfer it to the National Database:
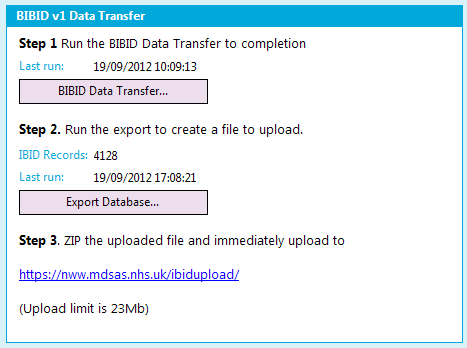
- Run the Step 1 of the BIBID Data Transfer which will Import from BIBID v1 (this may take several hours)
- When the BIBID Data Transfer is fully completed, run Step 2, Export database... (this should only take a few minutes)
- Zip the exported file and upload to the National Database via the upload facility at nww.mdsas.com/ibidupload (Maximum upload size 23Mb)
Note: the export and data transfer is a one-time requirement. All future updates will be transmitted in real-time from within the client application)
The BIBID Data Transfer functions on the IBID Installation and set up tab
Performance Note
If you dropped or disabled the index on the ILOG table, now is the time to re-create it. See SQL command above.
User Access
When the BIBID data transfer has completed successfully, you can allow users to access the database. Use the "User Management" tab to create user profiles. You may create other Administrator users to manage user profiles.
User App Installation
The client application is installed per-user, so each user needs to install their own copy of the client software, which is vital to allow standard user profiles the ability to receive automatic program updates.
- Download the IBID User Application Setup from www.ibidb.org/ibid
- Unzip and run the aquila_setuip installation program.
- Enter your own Server URL in the field when prompted. Takes the format http://servername:8099/bin
- Double click the Aquila CRS icon on your desktop to run the application
- Enter the username and password assigned by your system admin
- Click the Connection link and enter the Server URL previously mentioned (you only need do this once).
To discuss any aspect of the installation please raise a ticket on our helpdesk system, or call 01964 503400.

